
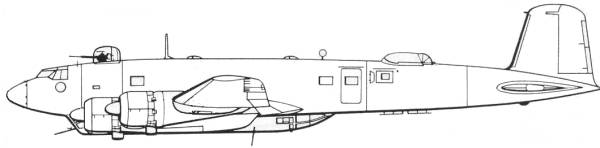
Focke-Wulf Fw 200C-4
The Focke-Wulf Fw 200 was designed solely as a commercial transport, an issue that would haunt its career as a military aircraft. The construction of three prototypes began in the fall of 1936 in parallel with the preparations for a production run of nine aircraft. The first prototype flew twelve months and eleven days from the date the contract had been signed by Lufthansa. Of the first three aircraft one was assigned as Hitler's personal aircraft. The next nine aircraft, essentially the A series went to a variety of civilian airlines, Lufthansa and other foreign users. In late 1938 work had begun on the B series which was to be the initial production version. Interest in this version had been shown by the Japanese and the Finnish airline Aero O/Y. Interest was also shown by the Japanese Navy for an example modified for the long range maritime reconnaissance role. As it turned out hostilities had begun in Europe before any B series could be delivered and permission to export was withheld. Although Lufthansa did operate the aircraft at no time were more than four included in their fleet strength. Most of the B series run was taken over and used by the Luftwaffe in support of operations in the invasion of Norway.
The C series came about as a result of the He 177 not being ready for service when hostilities broke out and the Luftwaffe not having any other aircraft with sufficient range for reconnaissance and anti-shipping roles. The Condor employed a relatively light structure hardly suited for the military role that was being envisioned for it, but the Focke-Wulf team, based on experience in modifying one to meet the Japanese requirements, drew up a proposal for the C version and it was promptly accepted by the RLM. Except for some minor local strengthening the C model was little changed from the B. A preproduction batch of 10 C-0's were produced which were actually B's that were on the assembly line when the war started. In fact the first four were too far along to be converted to the maritime reconnaissance role and were completed as transports and utilized during the Norway campaign. The balance were completed with defensive armament and bomb racks and during the spring of 1940 were delivered to KG 40 which began attacks on British shipping from Danish bases.
The C-1 version introduced a long ventral gondola offset to starboard, the nose of which contained as 20-mm cannon and the rear portion contained an MG 15 on a flexible mounting. The forward turret of the C-0 was replaced with a raised cupola with a single MG 15. Twenty-six C-1's had been produced by the end of 1940 but the attrition rate was high due to the transport heritage. There were numerous cases of the rear spar failing and the fuselage breaking immediately aft of the wing on landing. During the later half of 1940 rarely were more than six to eight Condors available for operations at one time.
The C-2 was an interim version with only minor changes pending the introduction of the C-3 version and had only minor changes, none of which addressed the major structural issues. By late summer of 1941 offensive operations had to be curtailed owing to rising combat attrition. Their task being largely confined to shadowing convoys.
By the summer of 1941 the improved C-3 version began to reach KG 40. It embodied major structural strengthening of both the rear spar and the fuselage, although the Condor would continue to suffer structural failures. There were three variants of the C-3, the U1, U2 and U3 with the differences between them being variations in armament and bomb sights. In February of 1942 production shifted from the C-3 to the C-4, which was built in larger numbers than any other variant. The primary differences from the C-3 being search radar and communications equipment. During 1942 a total of 84 C-3's and C-4's were produced.
Production continued through 1943 with a total of 76 aircraft being delivered. These included a number of C-8's built especially as carriers for the Hs 293A missile. A number of C-3 U1's and U2's were adapted to carry the Hs 293A and these were re designated C-6's. The last eight aircraft were completed in January and February of 1944 but by that time its days as anti-shipping aircraft were numbered.
The Kit
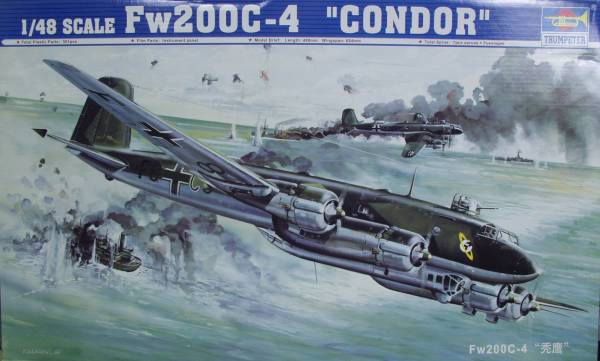
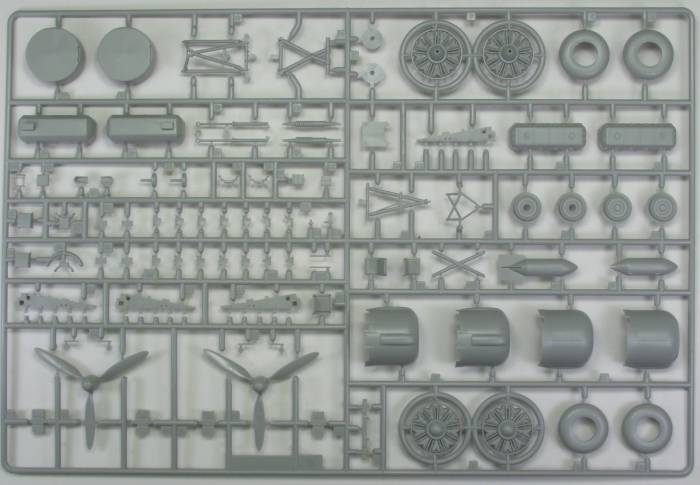
The Trumpeter kit comes in a large top opening two part box made of corrugated cardboard with nice artwork of the subject aircraft going about its business. Inside the box there are six bags. Two of them each have a single large sprue with the wing and tail parts, two of them have two sprues each which contain the balance of the small parts, one bag contains the clear parts and the last bag has the decals and the film for the instrument panel. The fuselage halves are separate and are housed in a partition inside the box. The parts are molded in a gray plastic with nice recessed panel lines and rivet detail and raised detail where appropriate.
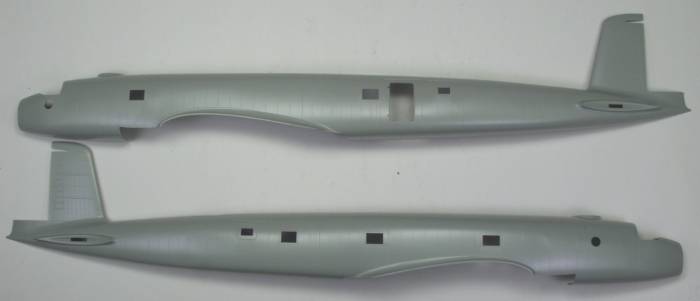
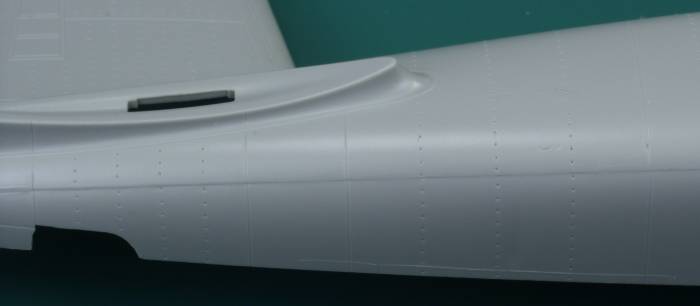
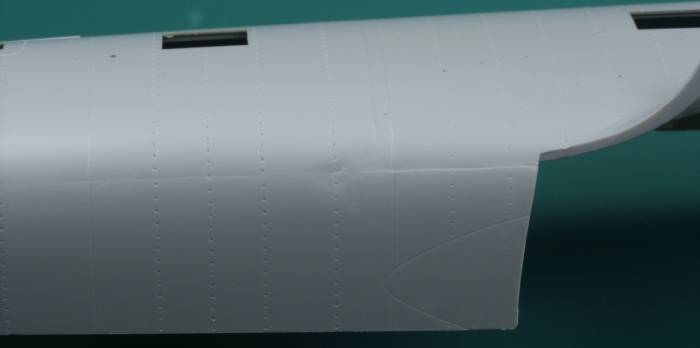
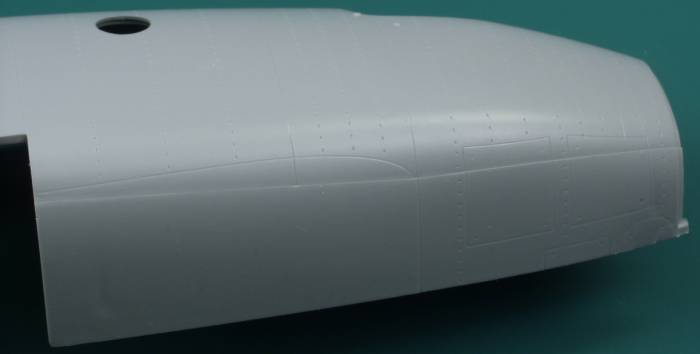
The surface has a nice smooth finish and except for the fuselage, I found no sink marks or other surface blemishes on any of the airframe parts. The fuselage however suffers from a problem that seems to be common with other large Trumpeter models in that it has a seam running lengthwise down the side of the fuselage. While it's not as bad as the one on their RA-5C, it is noticeable enough to require some work. Fortunately it is mostly just a slight difference in height that can be sanded down without doing much damage to the surrounding detail. It appears as if their tooling is made up of two parts and where the two join it's not a perfect joint. There is also a sink mark near the wing root on one side. The photos immediately below the one showing the fuselage halves, illustrates the issue. The control surfaces are separate and thus pose able and there is some structural detail in the wing above the flaps that would show if you decided to lower them but there is no mention on lowering them in the instructions. The fabric covered areas look a bit over done to me but this seems to be fairly common. The parts are for the most part flash free and there is only minimal parting lines to clean up on the smaller parts. I found no ejector pin marks on the usual suspects such as inside landing gear doors or on the gear struts themselves. There are a couple on the fuselage interior that might be visible but I won't know till the interior is built up. There are more in the tops of the wheel wells which are boxed in but show no structural details.
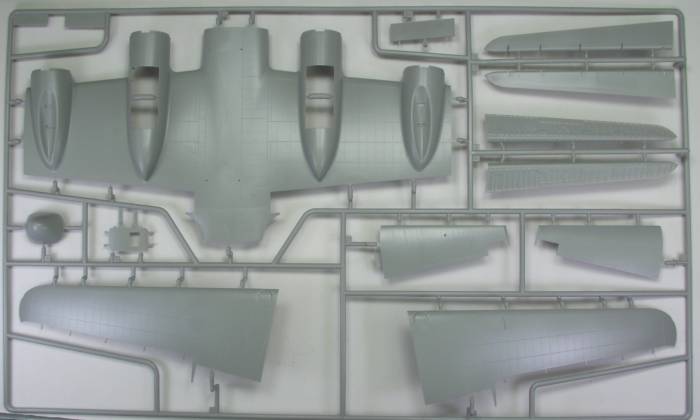
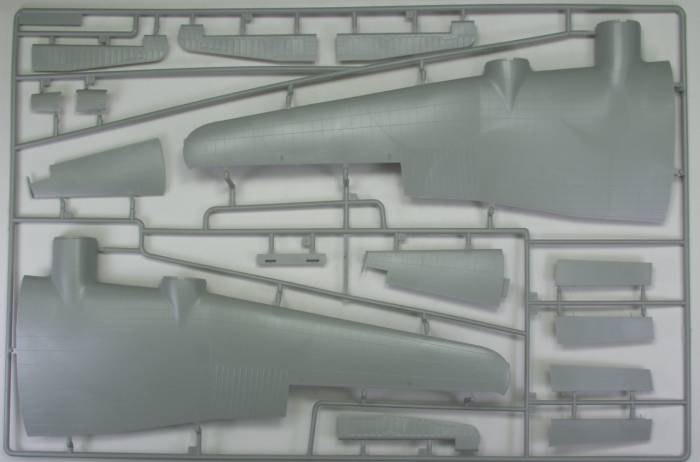
The interior is quite well detailed with plenty of things to busy up the cockpit, the radio operators area and the fuselage floor extends to the rear of the aircraft and has all the long range fuel tanks and other details included. The crew seats do not include belts or harnesses. Much of this will disappear once the fuselage is closed. The inside walls of the fuselage however are void of detail. The rear fuselage door is separate and could be posed open but there would be no structural detail to see. The engine detail is rather lacking but it should be enough once enclosed in the cowlings. There is no internal bomb bay detail and the doors are molded shut. The complex landing gear is well represented and appears sturdy enough to support this large aircraft. The tires are not weighted. Two bombs are supplied for the outer wing racks but nothing but the sway braces are supplied for the under cowling racks. The wings are assembled from five sections, three lower and two upper that overlap and should provide the correct dihedral for the outer wing sections but the wing to fuselage joint looks a bit on the anemic side and no wing spars are supplied. By my count there are 281 parts molded in gray. See photos below. Note: only one of the two engine sprues is shown.


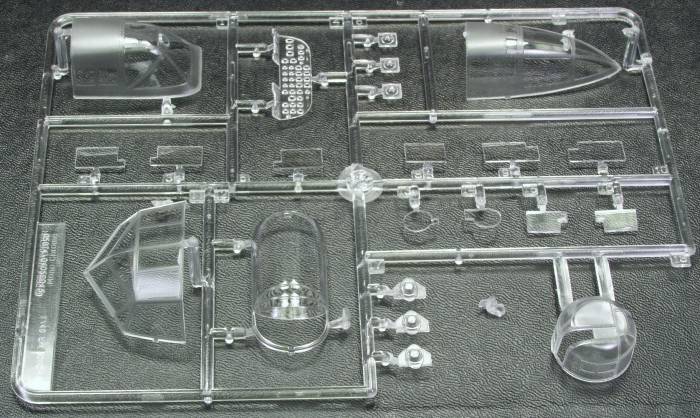
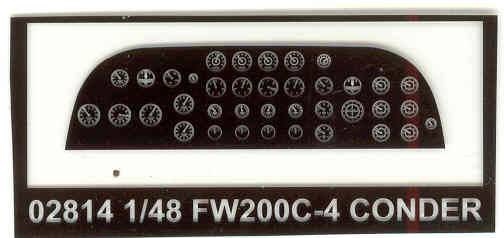
The clear parts are thin and very clear and include the instrument panel which has a film to place behind it for dial detail. There are a total of 23 clear parts bringing the kit total to 304.
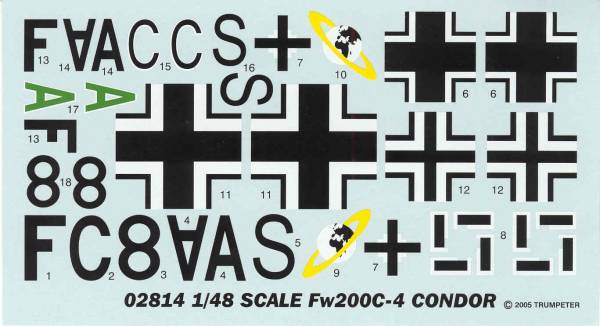
The decals include markings for two aircraft, both from KG 40. They are thin and look to be opaque and are in register. The supplied swastikas are the aggravating assemble yourself type. See photo below.
The instructions consist of an A4 sized booklet that is stapled together and contains 16 pages. The first page has instructions for the instructions, an icon guide and decal instructions, the next two pages are a sprue maps, pages four through sixteen are assembly diagrams. The painting and decal information is covered on an additional 11" x 16" sheet printed in color on one side on glossy paper and includes a paint chart calling out Gunze Sanyo colors and color names.
After Market Goodies
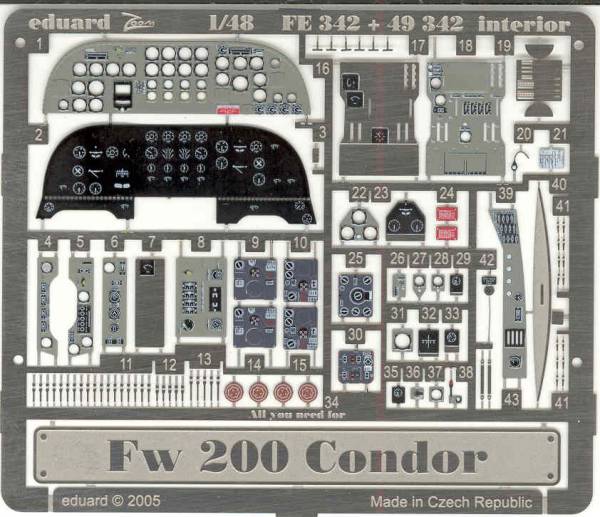
For after market I chose an Eduard color zoom set [FE 342] which will add some easy color to the most visible portion of the cockpit. Unfortunately it does not include belts and harnesses so those will need to come from the German bombers set.
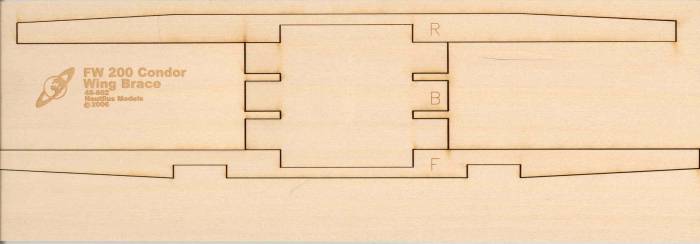
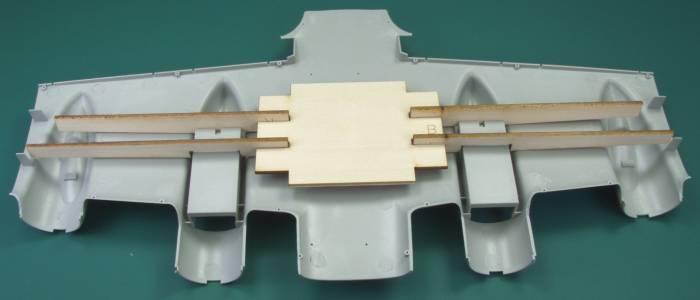
Due to the rather weak looking wing to fuselage junction I decided to get the Nautilus wing brace [48-802]. This is laser cut from model aircraft grade plywood and consists of three pieces, a front and rear spar and a mounting base. The three parts are snapped out of the carrier and the spars are glued to the base. The part then fits into the lower center wing panel with the rear spar flush with the wheel wells. The upper wing halves are then added. There is no modifications required to any of the kit parts and the base fits below the kits floor assembly. The instructions are printed on one side of an 8 1/2" x 11" page. This can be purchased here. See photo below.
Conclusions
This is a first class kit and although Trumpeter has a reputation of having some fit issues it should produce a very nice end result, also a very large one. Due to the physical size and parts count I wouldn't recommend the kit to those just getting started in the hobby but those with a modest amount of experience shouldn't have any major problems.
Links to kit build or reviews
There's not a lot out there on this kit, another in box review can be found here and here and some photos of a completed model here.
References
"Warplanes of the Third Reich" by William Green
"Focke-Wulf Fw 200 Condor" by Marek J. Murawski
"Kampfflieger Vol 2, Bombers of the Luftwaffe July 1940-December 1941" by J. Richard Smith and Eddie J Creek
Back to the Misc German page
The Build
As
with
most kits assembly begins with the interior parts and this kit is
no different. Trumpeter provides a very complete interior that will
all
but disappear when the fuselage is closed up. I waffled on whether
to
bother with the bulk of the interior but since it makes up almost a
third of the kit parts wise it seemed like I'd be throwing away a
lot
of the kit if I didn't use it. Two things spoiled the interior for
me.
One was lack of any interior structure on the inside fuselage walls
which shows very prominently in photos of the interior and the
other
being the rather poor fit of some of the interior parts, namely the
fuel tanks and the platforms they mount on. Both were molded in
halves
and fit poorly. The photo below shows the typical fit of the tank
assemblies.
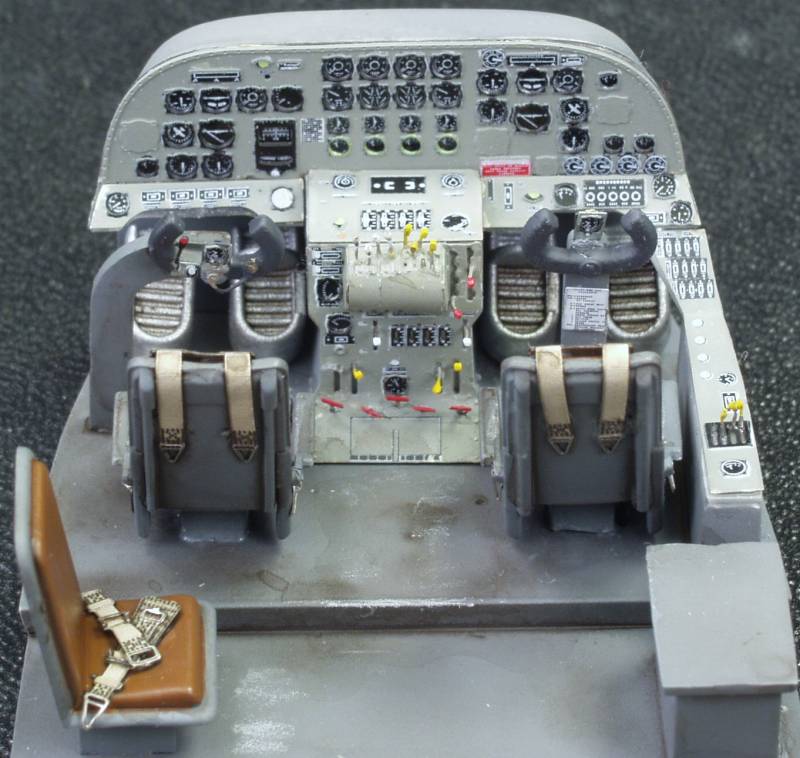
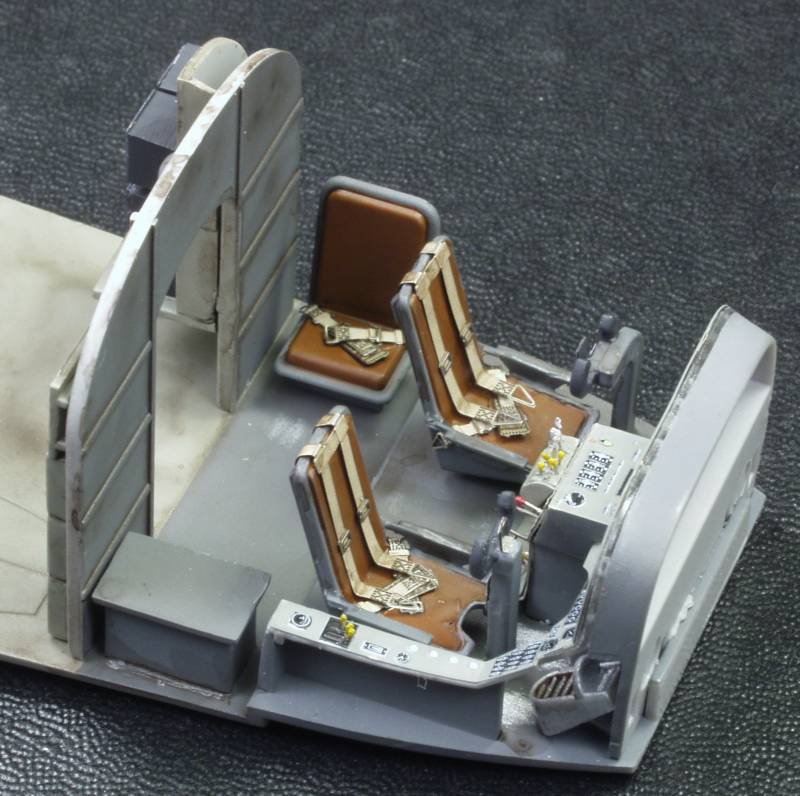
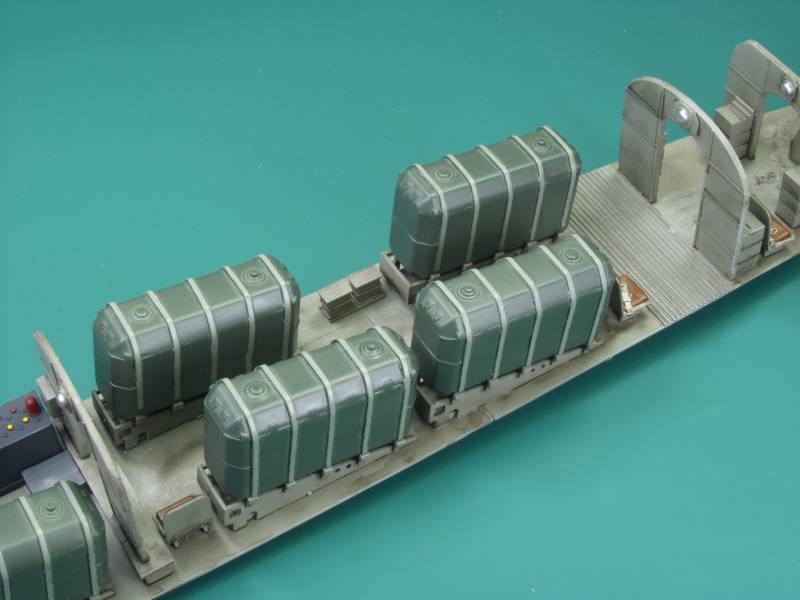
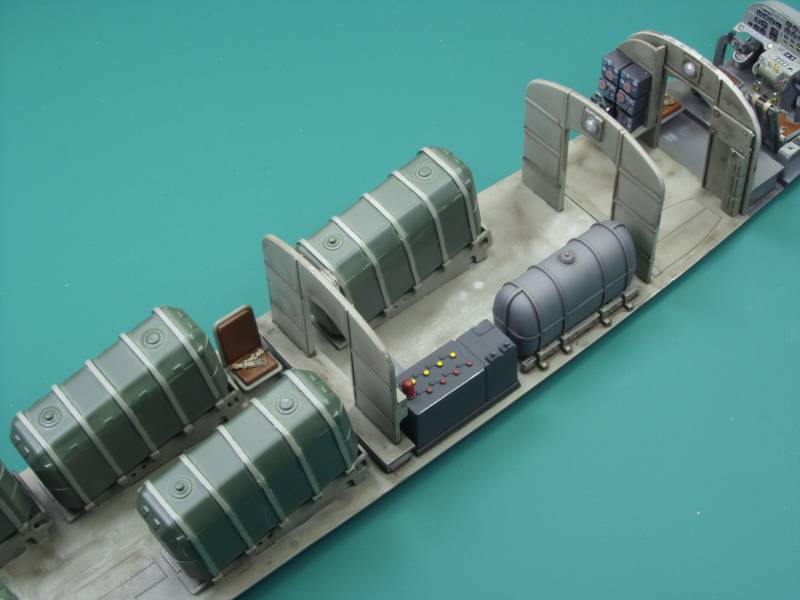
Photos of the real tanks show no seam around the middle and the thought of filling and sanding five tank assemblies that would disappear later did not particularly excite me. I ended up sanding the sides flat then fitting some .010" thick styrene over the sides and after the glue dried I blended in it in at the top and bottom. The bands were then replaced using .010" thick strips to match the width of the strips on the top of the tank. While it doesn't sound that easy it was much quicker than multiple coats of filler and trying to sand between the existing bands. The rest of the interior went together well if a bit tedious, especially the PE levers on in the cockpit. The photos below illustrate the completed interior. First up is the cockpit.
Looking at the radio rack forward to the cockpit.
Then a series showing the interior from front to rear.
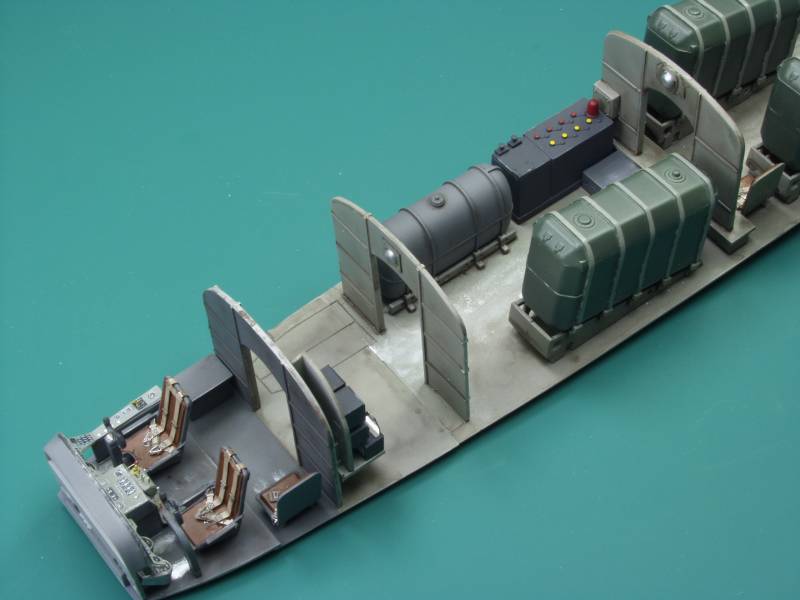
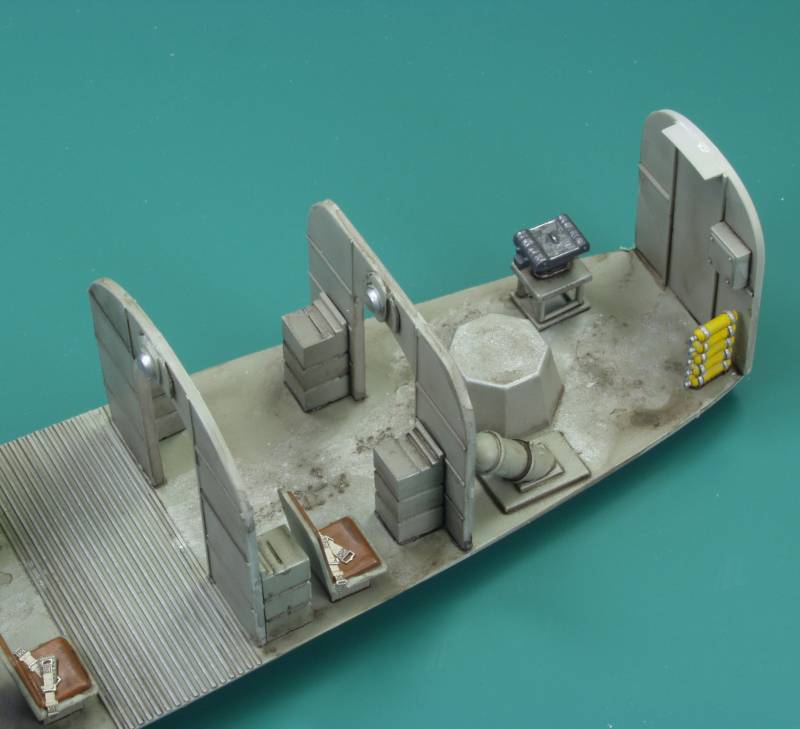
A view from the opposite side.
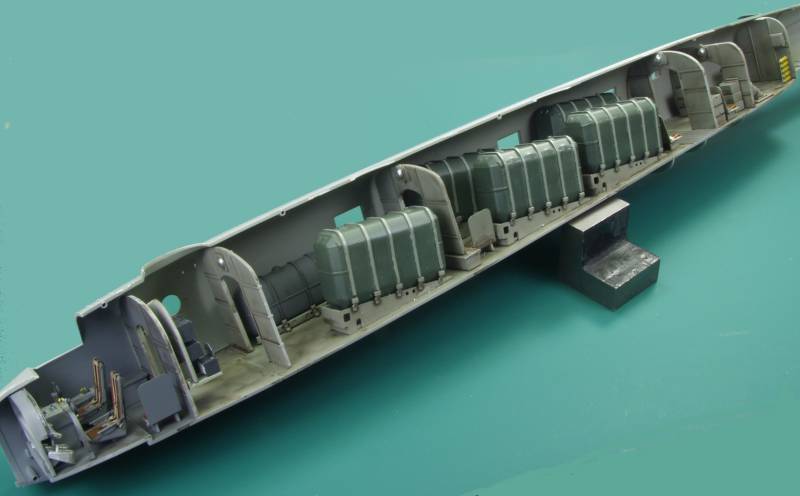
What it will look like fitted into the fuselage. Note I still need to work on a few issues with the fuselage and windows before the interior gets permanently mounted.
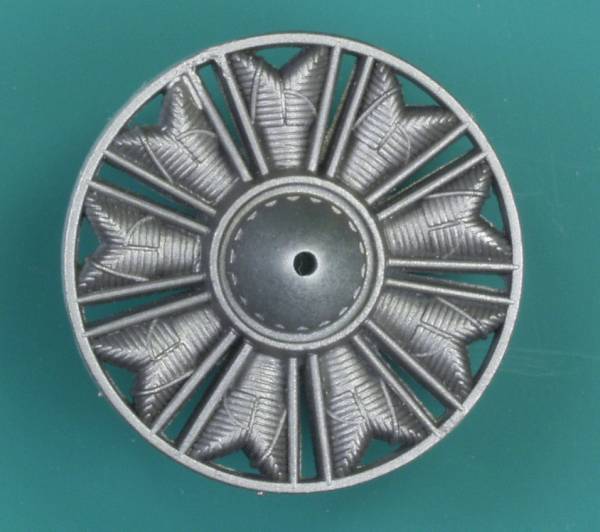
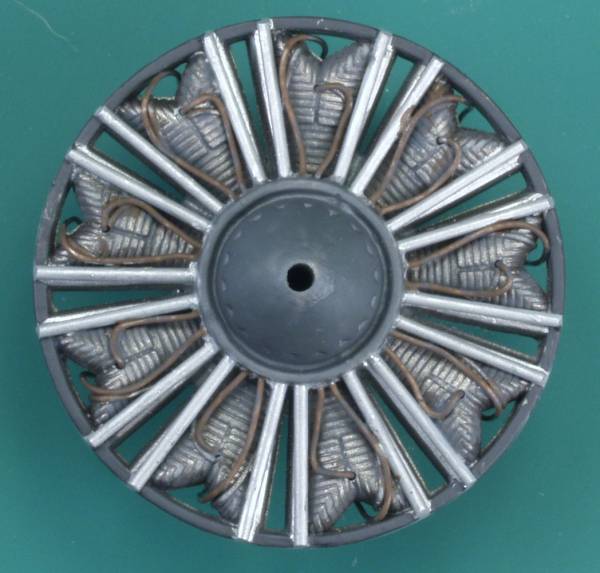
To take a break from the interior I turned to the engines which looked a bit one dimensional to me. I laminated some styrene rod over the push rods and overlaid some solder for ignition wires and made the engines look a bit more three dimensional. See photos below of before and after.
Next up I tackled the wing assembly. First I assembled the Nautilus wing brace .

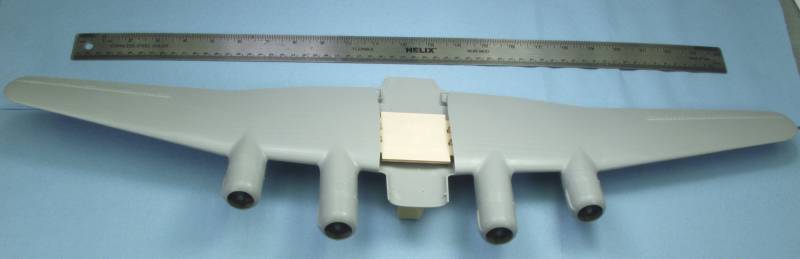
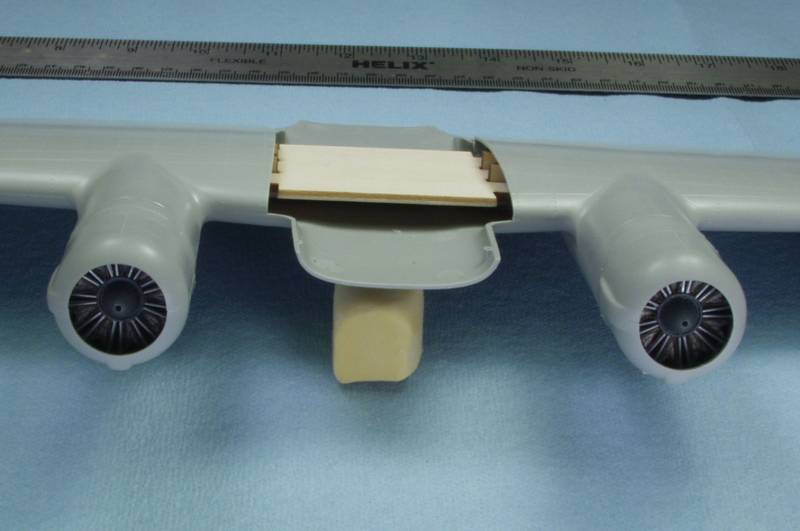
Then it was dropped into position on the wing center section and the rest of the wing assembled.
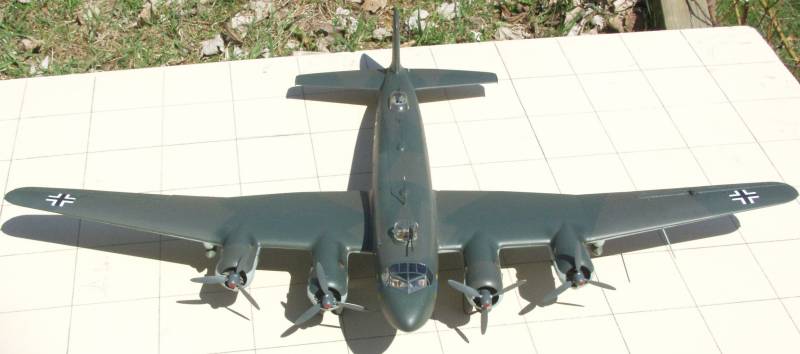
As can be seen this thing is rather large, that's a 24" rule in the background.
Everything fit reasonably well, there will be some minor seam work to do but not all that much. I was glad I added the extra detail to the engines as they show up more than I thought they would.
I pretty much stalled out on this build when my wife of 31 years passed away in February of 2009, my last update here was in January of 2009. It took me a couple of years before I could finally get my modeling mojo back, however this kit still languished as by that time my interest had shifted to other things. I also found that when I tried to work on it I ran into things I didn't like and found it hard to spend the time to fix them. One of these issues was the window glazing as the kit supplied parts did not fit flush with the exterior of the fuselage and did not look right recessed. I eventually made all new glazing. Fortunately the windows were square except for the two round ones so it was just of matter of cutting and fitting. I made a punch for the round windows. I held them in place flush with the fuselage with a piece of Scotch tape on the outside and glued them in with a bead of clear parts cement on the inside. Once these were dry I removed the tape and masked the windows before closing the fuselage as I didn't want to risk punching one out later. Another issue was the over done fabric areas on the flight control surfaces and I spent a lot of time trying to find an easy way to fix this. In the end I used some Perfect Plastic Putty which is water soluble to partially fill the canyons between the ribs. I wasn't totally happy in the end but felt it was better than it was originally.
The fuselage went together OK but I took my time and did a progressive glue and worked my way around the fuselage. One thing I would do differently if doing it again would be to add some spreaders between the top and bottom of the fuselage. The edges tend to curl in slightly and since the interior bulkhead don't go all the way to the top there is nothing to push the edges up and you end up with a valley down the top and bottom seam. While this could be filled you would lose a lot of rivet and panel line detail so I chose to live with it. The seams did require a bit of filler but over all it wasn't that bad. Once the fuselage was set I attached the wing. This fit pretty good but required a bit of finessing and again a progressive gluing to get every thing mated nice with minimal seam work required. I was really glad I opted for the wing brace as even with it the wing is still pretty flexible. Sorry I didn't document any of this but when ever I could make some head way on this I didn't feel like stopping and taking photos.
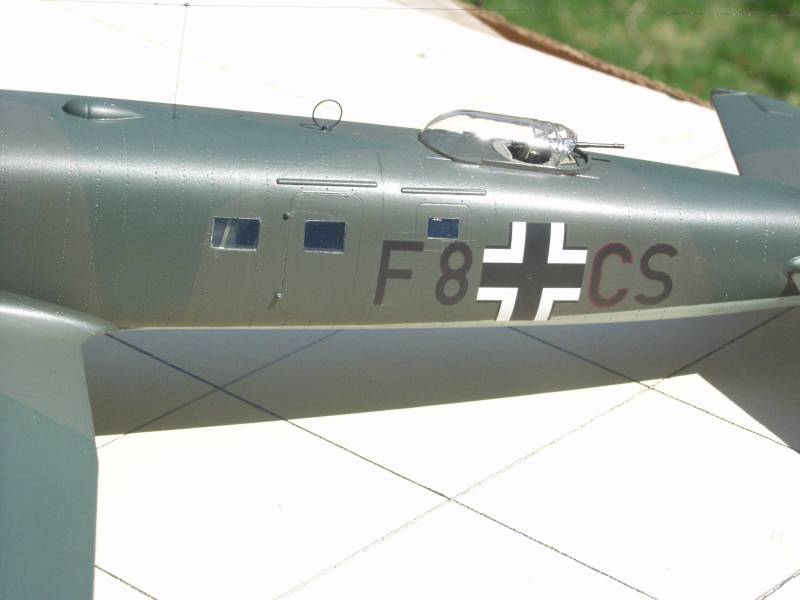
Once the seam work was done it was given a coat of primer and any touch up work done. The painting it self seemed to take forever due to the amount of masking require. I also found my work space was really cramped for aircraft this size as I kept knocking things over on my bench with the wings and tail when moving it around. Once the painting was done I had to decide what markings to use. I didn't like the kit decals as I could find no photographs of it and didn't want to trust that Trumpeter got them right. I also had a set of Koster decals which had the correct colors for the world in a ring but I still wasn't happy. I finally chose one that was profiled in both the Fw 200 Condor by Murawski from Kagero and Kampfflieger volume 2 by Smith and Creek from Classic Colours, which I liked because it had red centers on the spinners. This set me off on a tangent of learning how to make decals and that also ate a lot of time. Finally after what seemed an eternity of touch ups and fiddly bits it is all together. I found I didn't have a good place that was big enough or well lit to photograph it indoors and outdoors I didn't have a lot of good back grounds so you'll need to forgive some of the funky stuff in the back grounds of some of the photos.
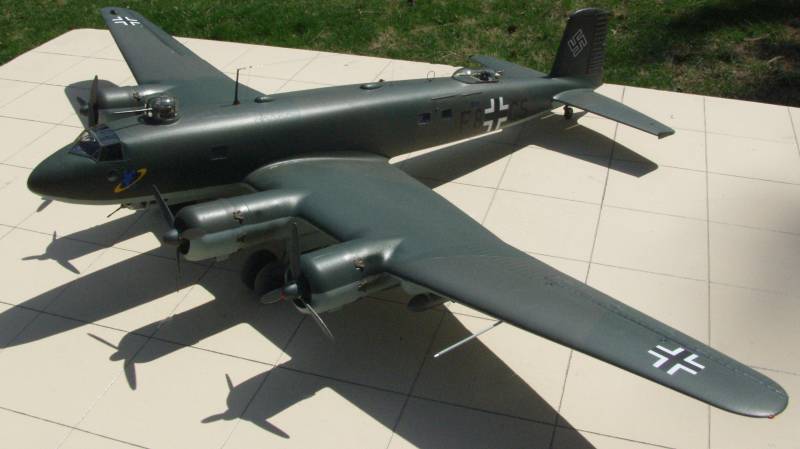
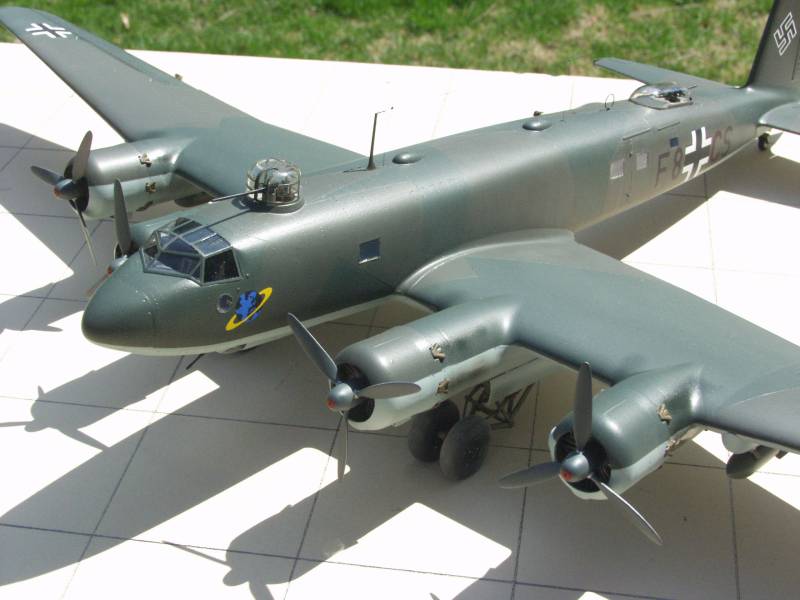
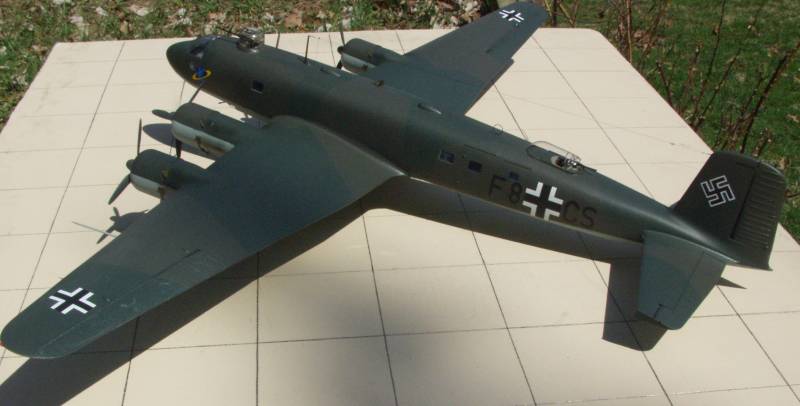
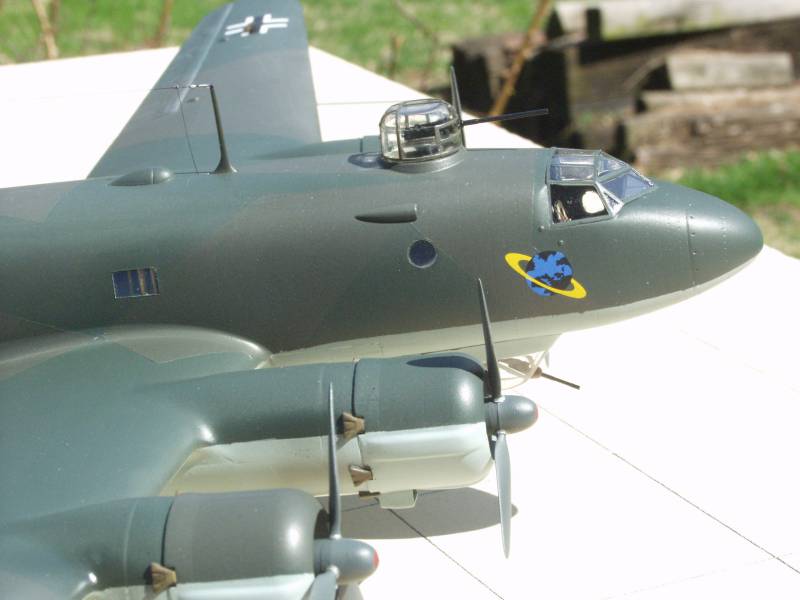
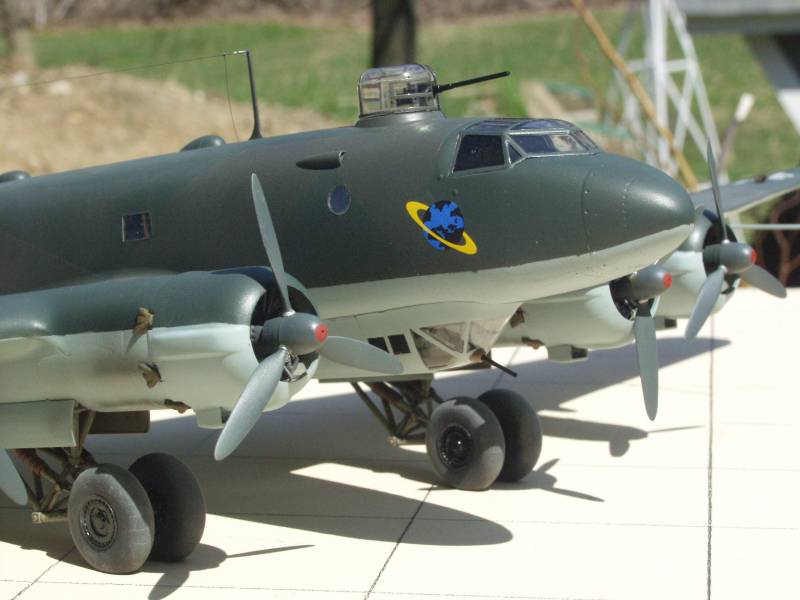
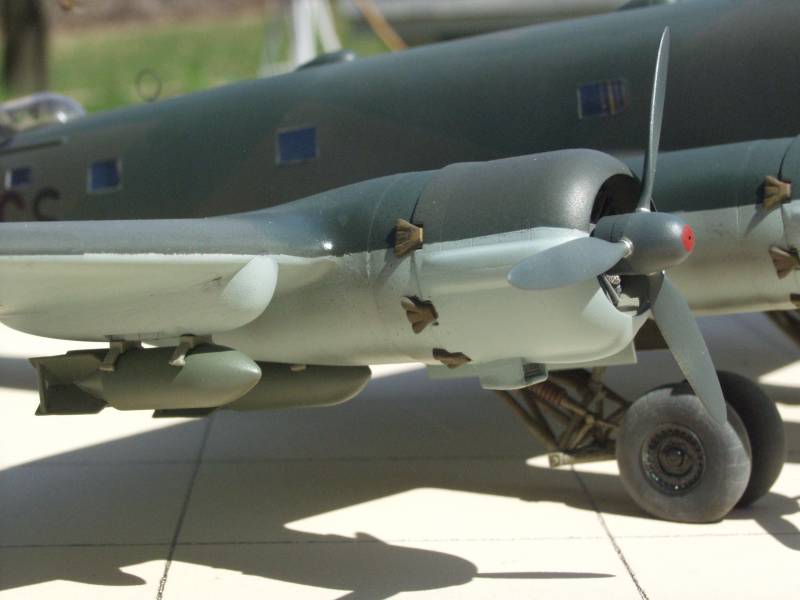
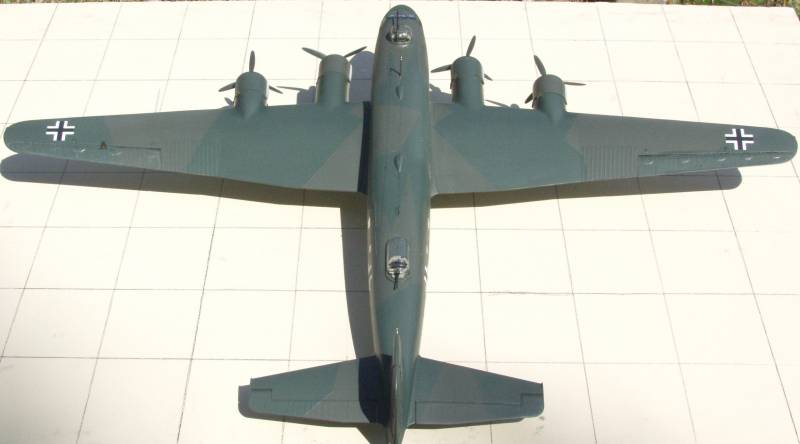
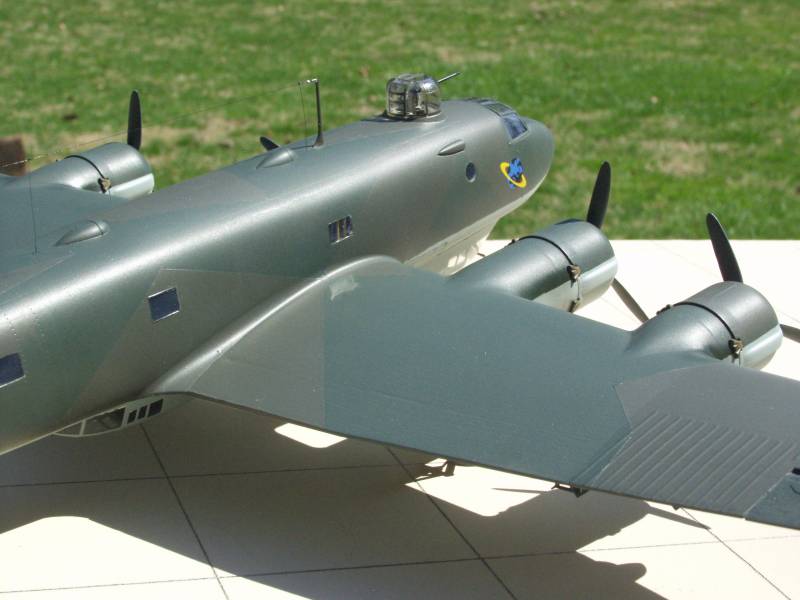
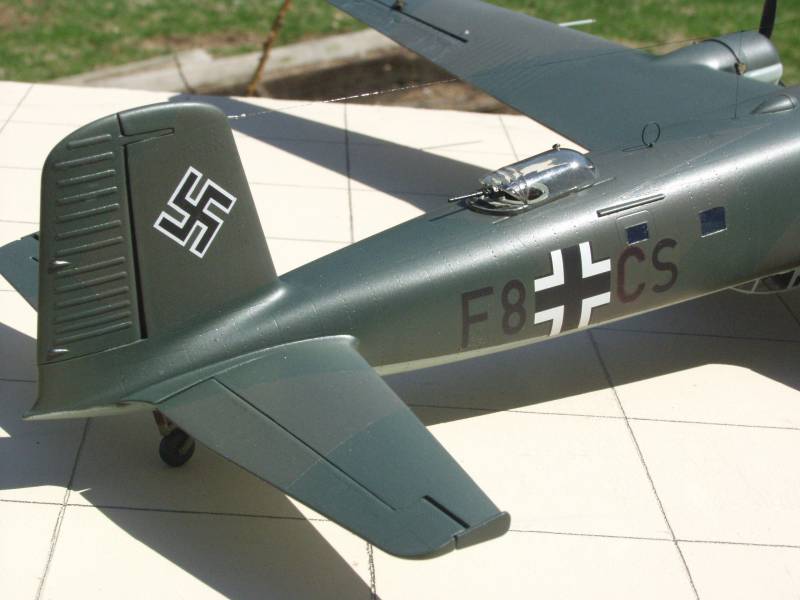
Overall I liked the kit and a lot of the issues I had with it were my own doing and if I were to build another one there are some things I would do different. The paint used was WEM RLM 72 and RLM73 and Model Master RLM 65. Some of the accuracy zealots found a lot of faults with the kit but most of them did not bother me enough to warrant the time to deal with them. I did extend the propeller spinners as the kit spinners end at the propeller blades and photos show that they extended back farther. I found some brass tubing with the same diameter as the spinners and epoxied it to the back of the spinners. This requires that you come up with a new propeller shaft as the kit part will be too short. I ended up using some 1/16" diameter brass rod for this which required drilling out both the hole in the engines and the back of the propellers. This fit snug enough that no glue was needed yet the propellers could be turned or removed if desired. I added the loop antenna made from wire, not all aircraft had this but the one I choose did. There should be a bulge under the forward part of the ventral gondola for the bomb sight and a tube for the trailing wire antenna which I did not add to mine. There are a lot of subtle variations on these aircraft so it helps to study photos of the real thing.
Updated 4/12/14Photos of the real tanks show no seam around the middle and the thought of filling and sanding five tank assemblies that would disappear later did not particularly excite me. I ended up sanding the sides flat then fitting some .010" thick styrene over the sides and after the glue dried I blended in it in at the top and bottom. The bands were then replaced using .010" thick strips to match the width of the strips on the top of the tank. While it doesn't sound that easy it was much quicker than multiple coats of filler and trying to sand between the existing bands. The rest of the interior went together well if a bit tedious, especially the PE levers on in the cockpit. The photos below illustrate the completed interior. First up is the cockpit.
Looking at the radio rack forward to the cockpit.
Then a series showing the interior from front to rear.
A view from the opposite side.
What it will look like fitted into the fuselage. Note I still need to work on a few issues with the fuselage and windows before the interior gets permanently mounted.
To take a break from the interior I turned to the engines which looked a bit one dimensional to me. I laminated some styrene rod over the push rods and overlaid some solder for ignition wires and made the engines look a bit more three dimensional. See photos below of before and after.
Next up I tackled the wing assembly. First I assembled the Nautilus wing brace .
Then it was dropped into position on the wing center section and the rest of the wing assembled.
As can be seen this thing is rather large, that's a 24" rule in the background.
Everything fit reasonably well, there will be some minor seam work to do but not all that much. I was glad I added the extra detail to the engines as they show up more than I thought they would.
I pretty much stalled out on this build when my wife of 31 years passed away in February of 2009, my last update here was in January of 2009. It took me a couple of years before I could finally get my modeling mojo back, however this kit still languished as by that time my interest had shifted to other things. I also found that when I tried to work on it I ran into things I didn't like and found it hard to spend the time to fix them. One of these issues was the window glazing as the kit supplied parts did not fit flush with the exterior of the fuselage and did not look right recessed. I eventually made all new glazing. Fortunately the windows were square except for the two round ones so it was just of matter of cutting and fitting. I made a punch for the round windows. I held them in place flush with the fuselage with a piece of Scotch tape on the outside and glued them in with a bead of clear parts cement on the inside. Once these were dry I removed the tape and masked the windows before closing the fuselage as I didn't want to risk punching one out later. Another issue was the over done fabric areas on the flight control surfaces and I spent a lot of time trying to find an easy way to fix this. In the end I used some Perfect Plastic Putty which is water soluble to partially fill the canyons between the ribs. I wasn't totally happy in the end but felt it was better than it was originally.
The fuselage went together OK but I took my time and did a progressive glue and worked my way around the fuselage. One thing I would do differently if doing it again would be to add some spreaders between the top and bottom of the fuselage. The edges tend to curl in slightly and since the interior bulkhead don't go all the way to the top there is nothing to push the edges up and you end up with a valley down the top and bottom seam. While this could be filled you would lose a lot of rivet and panel line detail so I chose to live with it. The seams did require a bit of filler but over all it wasn't that bad. Once the fuselage was set I attached the wing. This fit pretty good but required a bit of finessing and again a progressive gluing to get every thing mated nice with minimal seam work required. I was really glad I opted for the wing brace as even with it the wing is still pretty flexible. Sorry I didn't document any of this but when ever I could make some head way on this I didn't feel like stopping and taking photos.
Once the seam work was done it was given a coat of primer and any touch up work done. The painting it self seemed to take forever due to the amount of masking require. I also found my work space was really cramped for aircraft this size as I kept knocking things over on my bench with the wings and tail when moving it around. Once the painting was done I had to decide what markings to use. I didn't like the kit decals as I could find no photographs of it and didn't want to trust that Trumpeter got them right. I also had a set of Koster decals which had the correct colors for the world in a ring but I still wasn't happy. I finally chose one that was profiled in both the Fw 200 Condor by Murawski from Kagero and Kampfflieger volume 2 by Smith and Creek from Classic Colours, which I liked because it had red centers on the spinners. This set me off on a tangent of learning how to make decals and that also ate a lot of time. Finally after what seemed an eternity of touch ups and fiddly bits it is all together. I found I didn't have a good place that was big enough or well lit to photograph it indoors and outdoors I didn't have a lot of good back grounds so you'll need to forgive some of the funky stuff in the back grounds of some of the photos.
Overall I liked the kit and a lot of the issues I had with it were my own doing and if I were to build another one there are some things I would do different. The paint used was WEM RLM 72 and RLM73 and Model Master RLM 65. Some of the accuracy zealots found a lot of faults with the kit but most of them did not bother me enough to warrant the time to deal with them. I did extend the propeller spinners as the kit spinners end at the propeller blades and photos show that they extended back farther. I found some brass tubing with the same diameter as the spinners and epoxied it to the back of the spinners. This requires that you come up with a new propeller shaft as the kit part will be too short. I ended up using some 1/16" diameter brass rod for this which required drilling out both the hole in the engines and the back of the propellers. This fit snug enough that no glue was needed yet the propellers could be turned or removed if desired. I added the loop antenna made from wire, not all aircraft had this but the one I choose did. There should be a bulge under the forward part of the ventral gondola for the bomb sight and a tube for the trailing wire antenna which I did not add to mine. There are a lot of subtle variations on these aircraft so it helps to study photos of the real thing.