
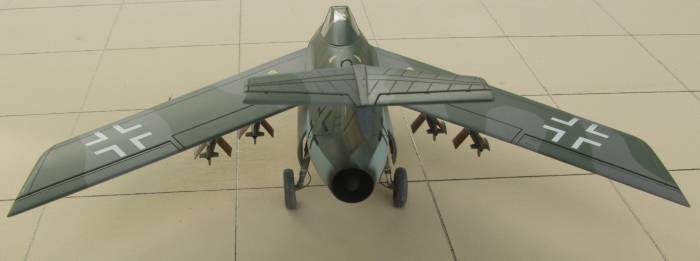
Ta 183
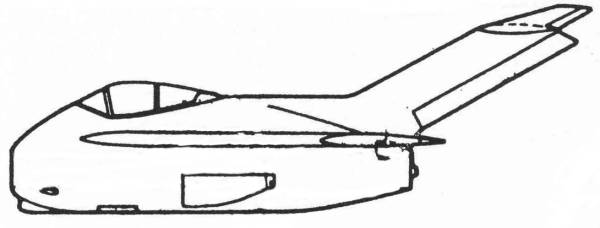
The Ta 183 was the winner of the RLM's Emergency fighter Competition in February of 1945. The project had proceeded to the point of completing a set of production drawings when the war ended. A set of these plans fell into British hands when they over ran the Focke-Wulf factory and the Russian's found a microfilmed set of the plans when they captured the RLM's headquarters in Berlin. These plans were taken back to the Soviet Union and in March of 1946 the MiG Design Bureau began construction of what is believed to be six prototypes based on the Ta 183 plans. Powered by a Rolls Royce "Nene" engine that they obtained from the British. Flight testing revealed that the design needed either leading edge slats or boundary layer fences to alleviate low speed stalling and decided on fences. Also the horizontal stabilizer was moved approximately one-third of the way down the vertical tail as a compromise between high speed and low speed stability. The modified Ta 183 is reported to have first flown in December of 1947. In May of 1948 a heavily modified version of the Ta 183 was ordered into production as the MiG-15.
That's an interesting story but other histories of the MiG-15 that I have read make no mention of this. In all likelihood we may never know for sure but it makes a good tale anyway. Appearance wise it certainly looks like they borrowed heavily from the design.
The Kit

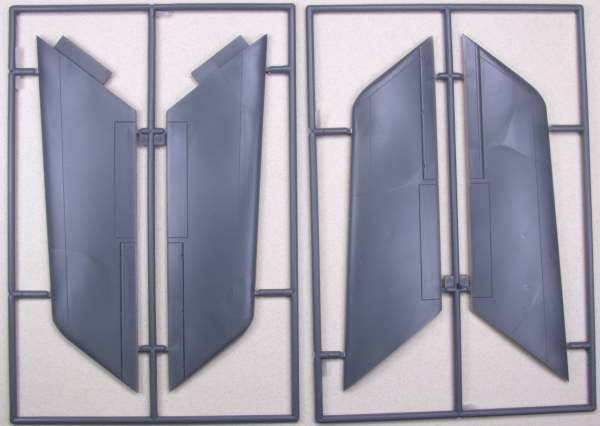
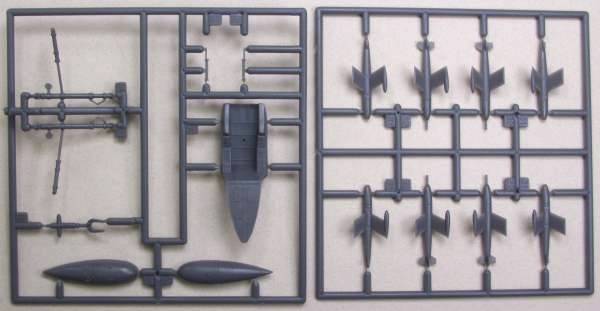
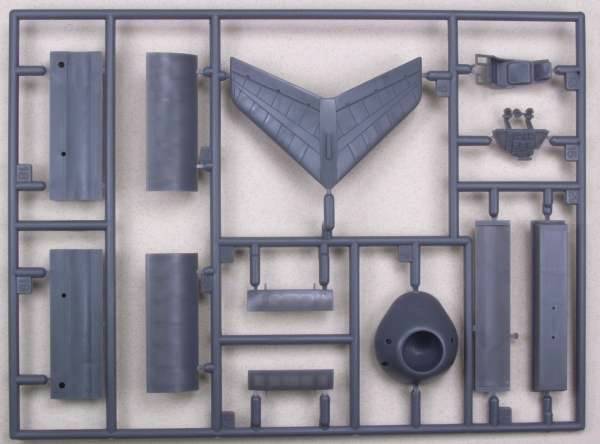
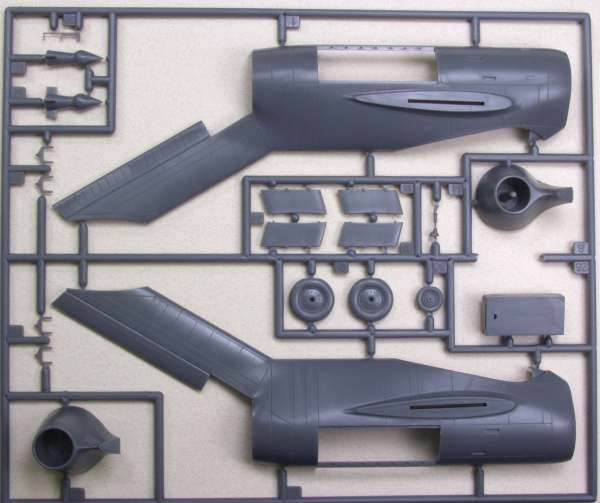
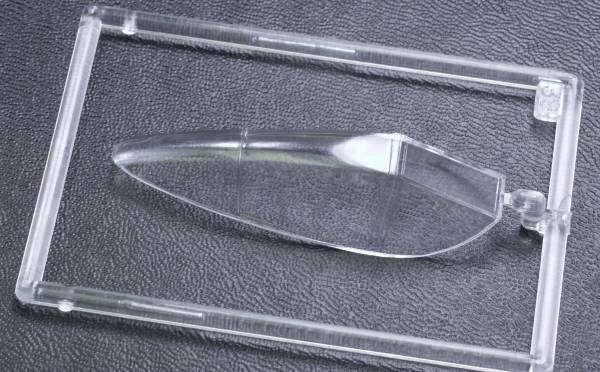
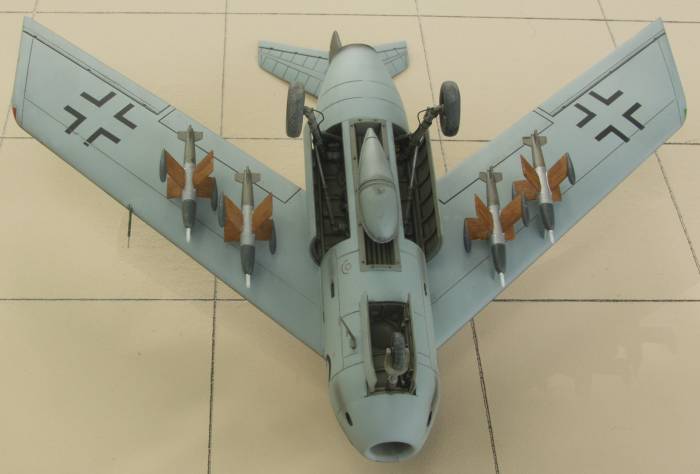
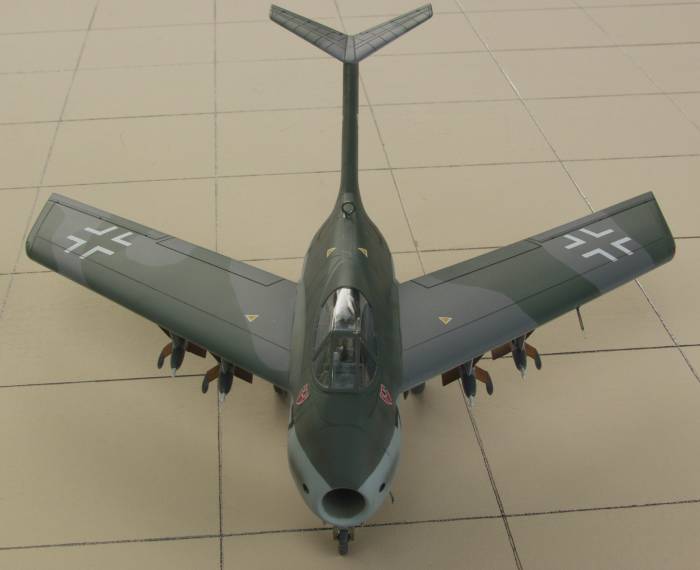
The AMtech kit comes in a sturdy top open two part box with attractive artwork on the top. Inside the box there are three bags, one with the clear parts, one with two sprues in dark gray and one with three sprues in dark gray. The gray parts have a smooth finish with nicely done recessed panel lines and recessed and raised details where appropriate. The parts have little to no flash and minimal parting lines on the smaller parts. The control surfaces are all fixed but have nice demarcation lines. The wheel wells are boxed in and display detail inside. The gear doors have nice internal detail. There are two tail pieces depend on which engine you want to use. The cockpit is nicely detailed considering the aircraft was never built. The kit comes with an optional drop tank that fits into a recessed area in the belly or has a cover if not used. It also has four Ruhrstahl X-4 air to air missiles. Altogether there are 52 parts in dark gray. The clear part is thin and clear and the main downside is that it needs to be cut if you want to display it open. Altogether there are 53 parts in the kit. See photos below
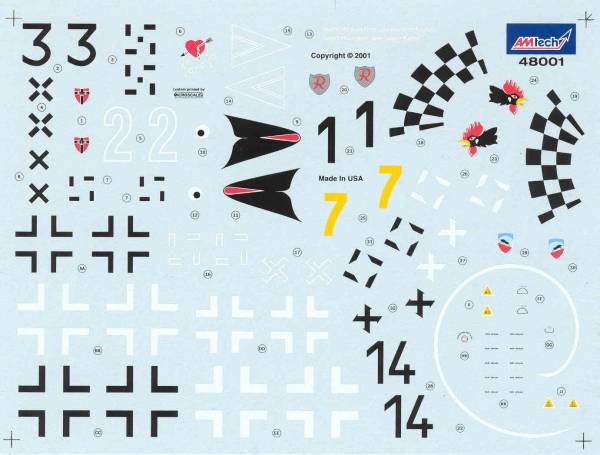
The decals provide markings for 6 aircraft and a variety of paint schemes, all fantasy of course. There is more than enough stencils for an aircraft this size. The sheet includes swastikas, albeit the assemble yourself variety. The decals are thin and in register. see below.
The instructions come in the form of an 8 1/2" x 11" eight page booklet. Page one repeats the box art and cover the history of the aircraft. Page two has a color chart with color names and RLM numbers where applicable and starts the assembly steps. Pages three, four and five covers the assembly and pages six, seven and eight covers markings and paint schemes.
After Market Goodies
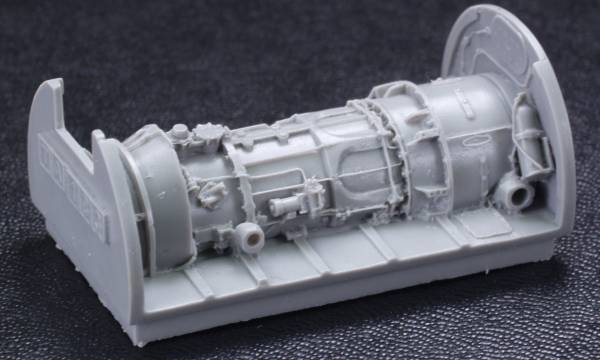
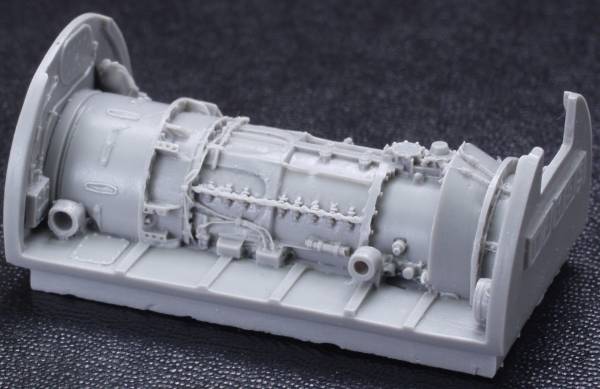
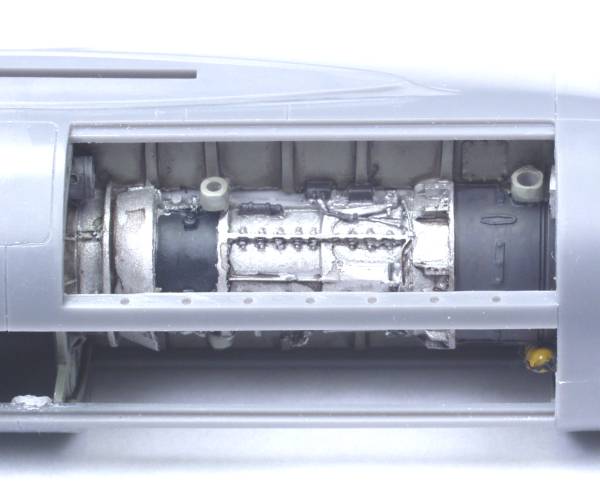
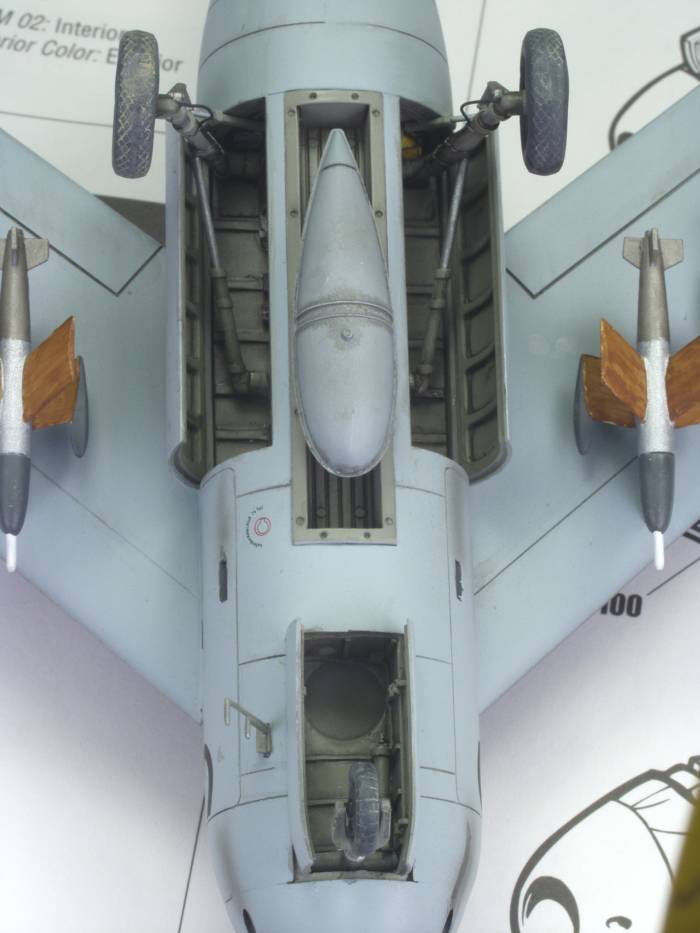
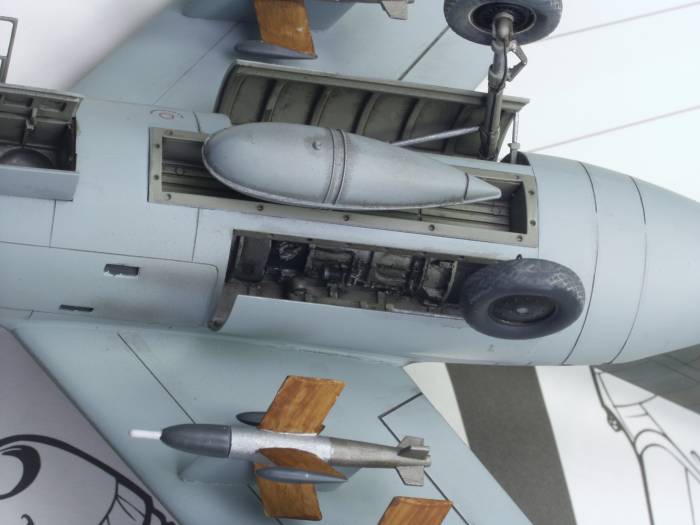
I had planned to build this one pretty much out of the box but those darned after market folks tempted me we three pieces I couldn't refuse. First is a replacement wheel bay showing the Jumo 004 engine parts. This is from Aires [4352]. It's a one piece casting in gray resin with exquisite detail. Everything is molded very crisply and it should be easy to paint and look great when finished and added to the model. I found no pin holes or short shots on the part. I won't know till I try fitting it but it might even fit without removing the casting block. See photos below.
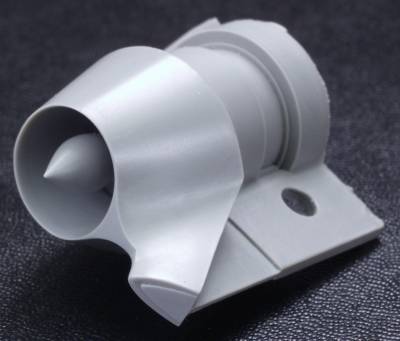
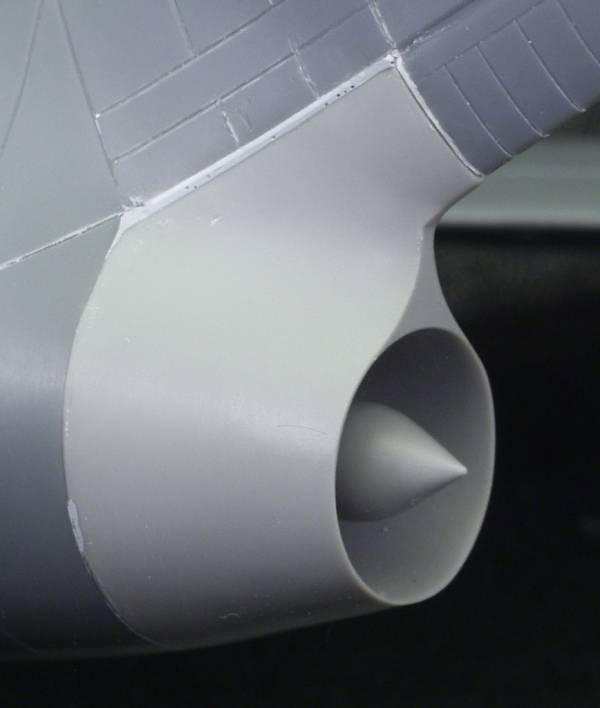
The other item is from Quickboost (Aires makes Quickboost parts) [QB 48130] and is a replacement tail cone which is a bit better detailed than the kit part. If you look inside there are actually vanes way back in there. It's molded in a light gray resin and I found no pin holes or short shots on the part. See photos below.
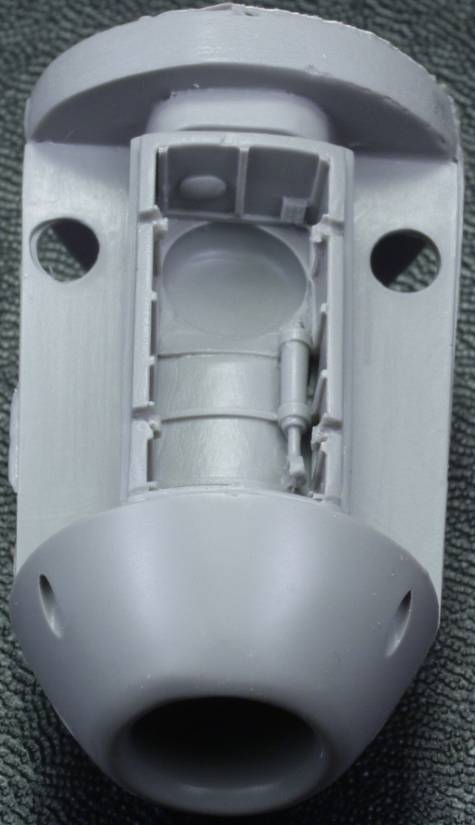
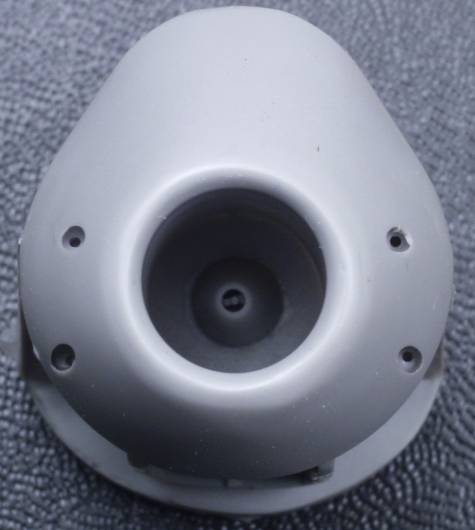
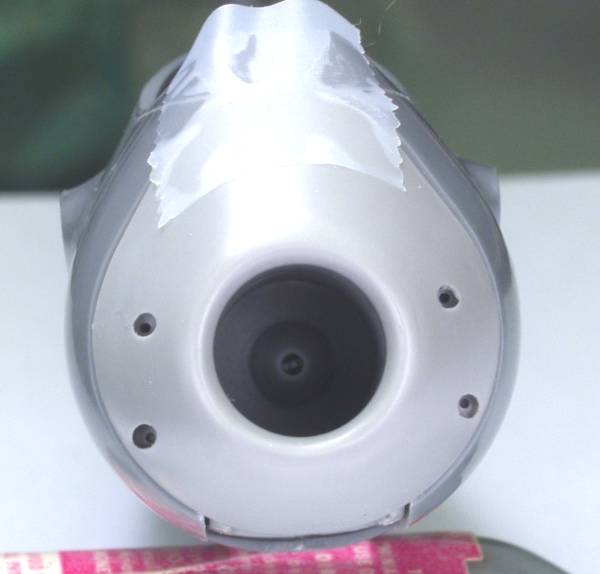
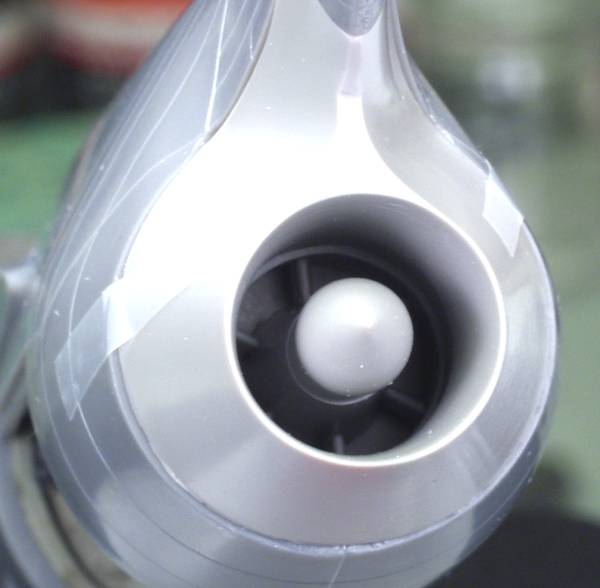
Also from Quickboost [48153] Intake and front wheel well. This piece improves the look of the nose as on the AMTech part the intake is rather shallow. This one is deep and includes the intake cone on the engine. It is attached to a replacement nose wheel well which makes this one piece that replaces two on the kit. The wheel bay is only slightly more detailed than the kit part but the intake is definitely an improvement. Both parts are molded in gray resin and exhibited no pin holes or short shots.See below.
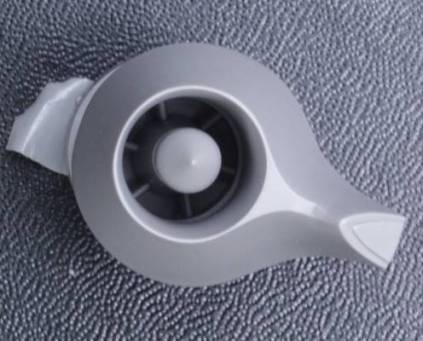
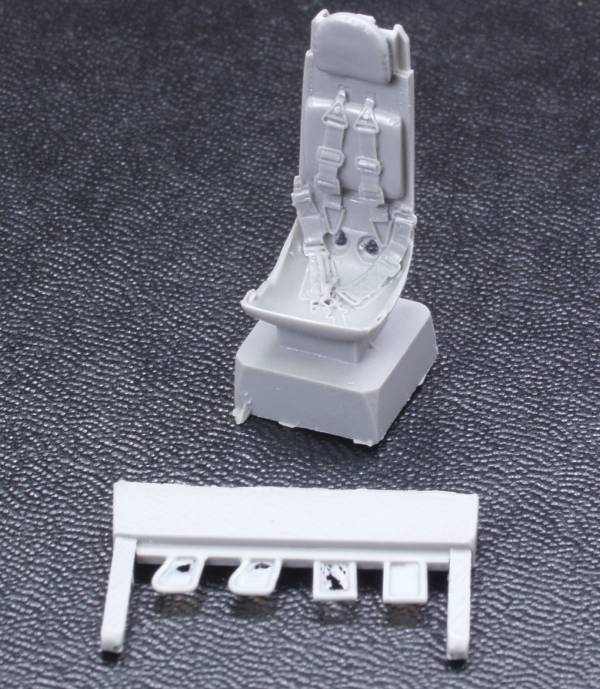
And lastly a Quick Boost[48025] replacement ejection seat. It is molded in a light gray resin and features finely molded harness and belt. The detail was crisp with no pin holes or short shots. See photo below.
Conclusions
This kit has been reviewed many times and has received high marks for fit, finish and engineering. The kit is pretty much complete as it comes and can be built out of the box with little in the way of after market goodies with the exception of maybe a photoetch seat harness. It's ashame that AMtech is no longer around to produce more models with the quality seen in this kit. Highly recommended to modelers of all skill levels.
Links to kit build or reviews
Kit reviews can be found here, here, here and here.
References
Back to the POST WW II Jets page
The Build
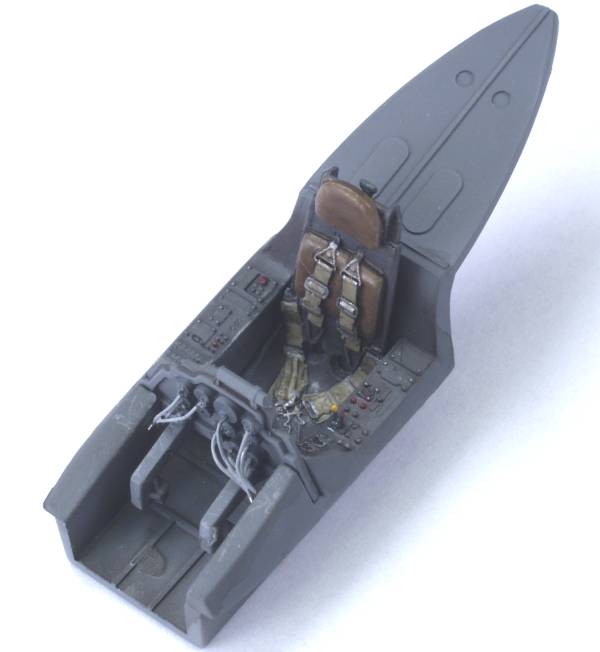
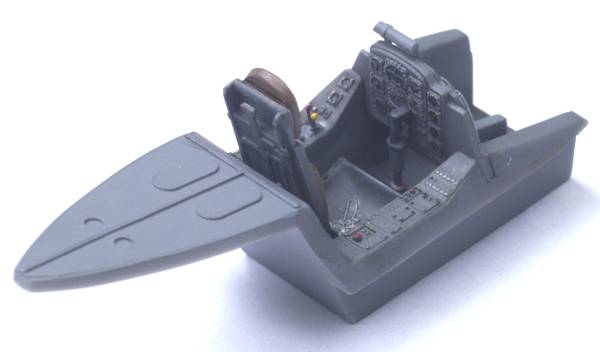
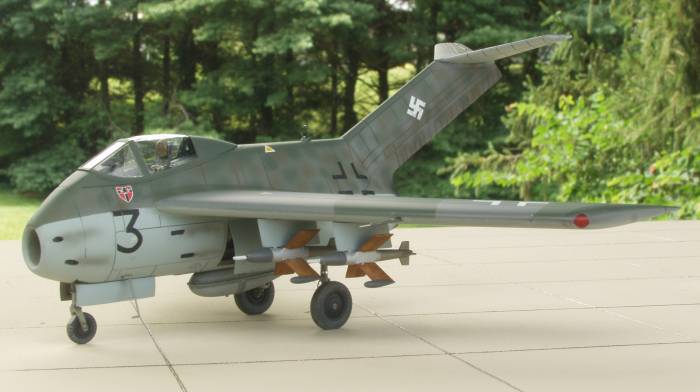
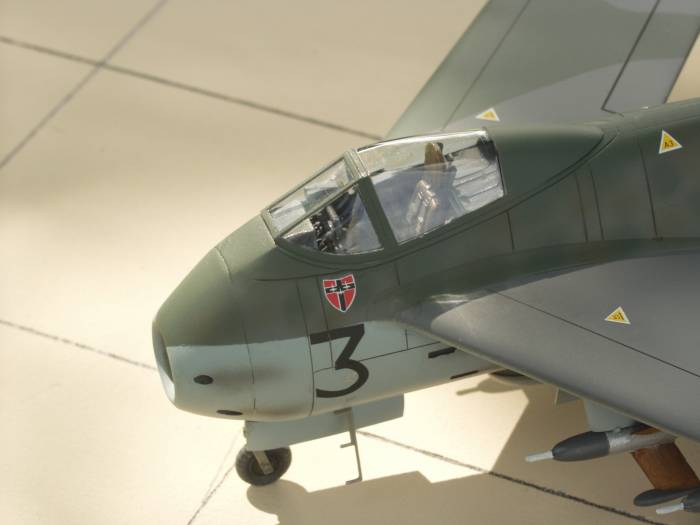
As is usually the case the build starts with the cockpit. The pit was pretty nice as is but I thought the seat was a bit plain so the Quick Boost seat was used in it's place. I needed to remove some of the back side detail to get it to fit but what was removed can't be seen anyway. I also added some PE levers from left overs to the side console. The panel had nice raised detail so it was painted up, the interiors of the dials painted black then the detail was highlighted with a silver pencil then a drop of Future was added to the dials for lenses. Since the rear of the control panel can be seen through the cockpit glazing I added some wiring to that area. After painting and adding some bits of coloring, the pit was given a wash and called done. See photos below.
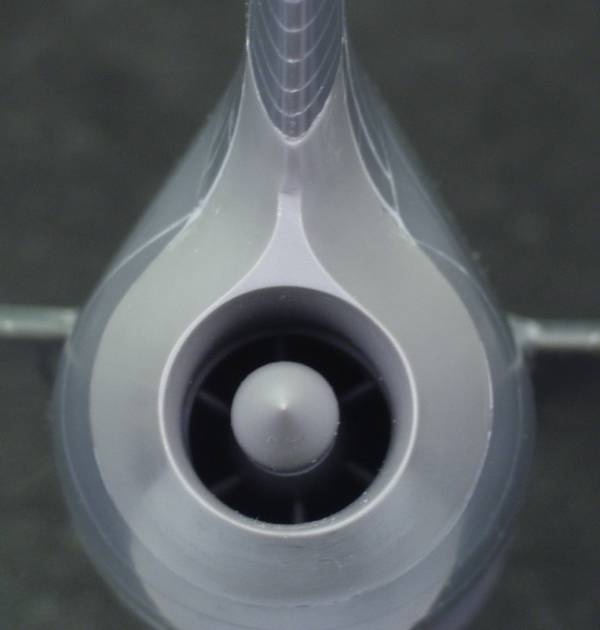
The fuselage was test fitted and found to align well. Then I tested the replacement engine bay reviewed above. I found I only needed to sand a little of the casting block to clear the wing recesses and it clicked right in place. It was then painted up and captured between the fuselage halves when they were glued together. It fit so well it really didn't need to be glued to the fuselage but I decided to tack it in a couple places with super glue. See photos below.
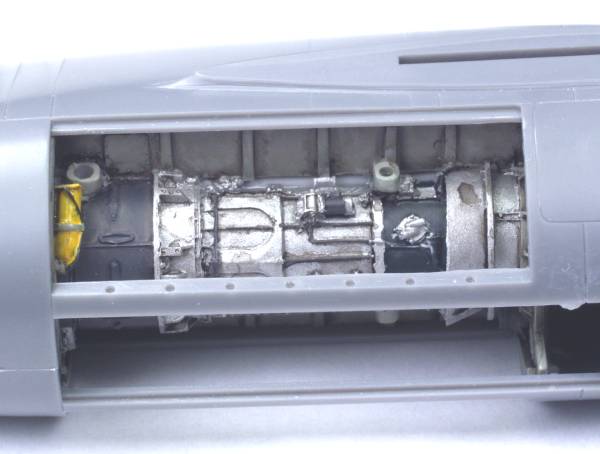
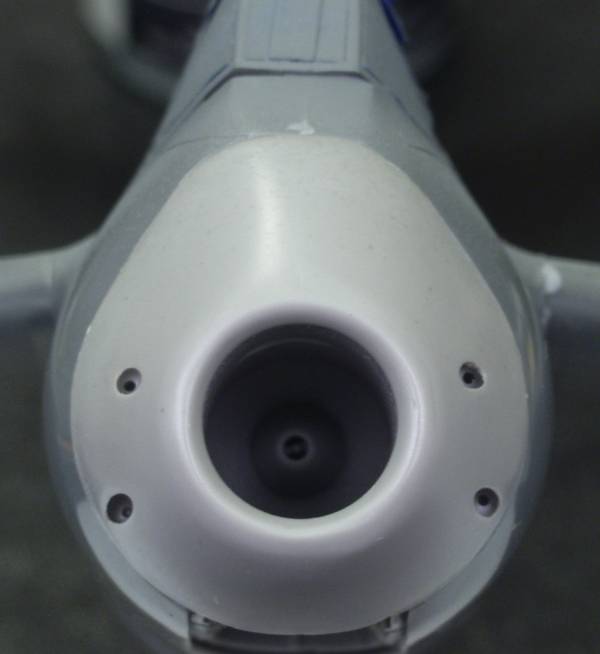
The next things that would need to be dealt with are the new nose and tail cone, also reviewed above. Here I was not nearly as happy with the fit as I was with the engine bay. It appears as if the original model parts were used as the masters and the shrinkage factor of the resin left the parts slightly undersized. Note: the ding on the side of the tail cone piece was self inflected and not a casting defect. The next three photos illustrates the problems.
Be careful when removing the casting flash above the intake trunking. The resin is paper thin there and it is easy to penetrate the trunking. Don't ask how I found this out ! I believe these can be remedied buy some careful reshaping at the nose and tail without damaging any other detail and the spaces between the tail cone and tail filled with thin sheet styrene. Anyway that will be the next challenge.
The test fitting done above was prior to installing the cockpit. After installing the cockpit into the fuselage I set about reshaping the nose to match the new intake. It was then I discovered that the new nose had an interference fit with the cockpit floor. It was not possible to remove any of the upper part of the intake trunking as it was already paper thin, so I needed to remove material from the cockpit floor. I used the Dremel tool for this with a cone shaped tool. I carved an arc out of the bottom of the floor until the nose slid into it's correct position. The floor at this point was also paper thin in the center. A word to the wise should you decide to use this part. With that accomplished the nose was glued in place using some thin super glue. By holding the lower forward portion of the fuselage tight to the nose wheel bay and applying the glue in stages around the outside of the nose, it fit better than the above photo, decreasing the amount of sanding that was required to blend in the new part.
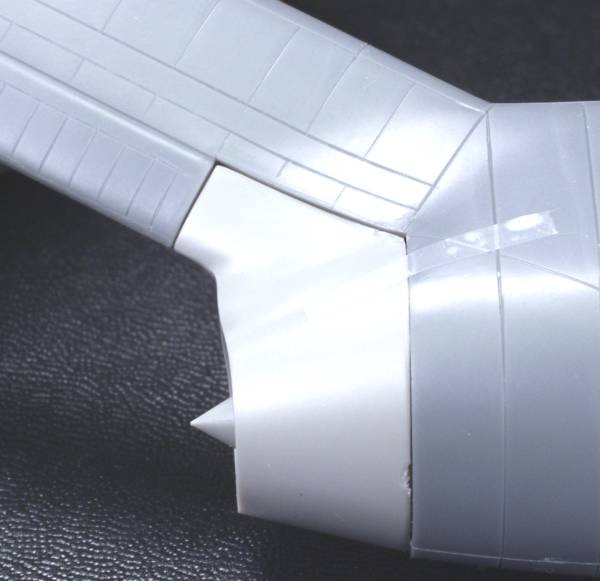
With the nose in place I cut two pieces of .010" thick styrene and glued them to the fuselage where the gaps were shown with the new tail cone. When the glue was dry I trimmed them to match the contours of the tail and rear fuselage. With this done the new tail cone was installed. The photos below show the new nose and tail pieces after they were glued in place and the fuselage re contoured to blend them in.
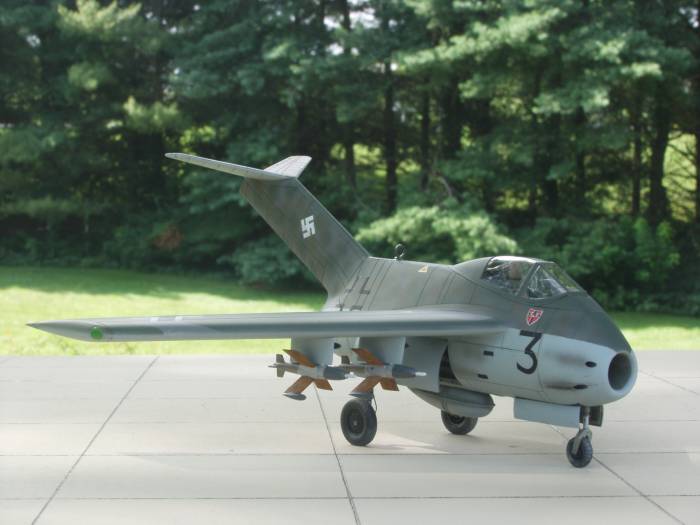
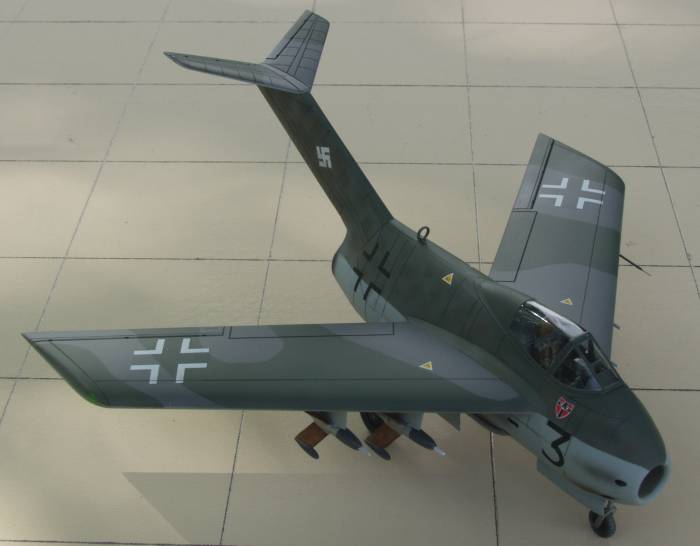
Well except for a struggle getting the decals to behave I finally got this little bird finished up. The next series of photos shows the final product. All in all this was a nice build and most of the additional work I had to do was result of the aftermarket goodies. Built straight from the box this kit easily rivals the likes of Tamigawa kits. It's unfortunate that the company didn't survive to produce their planned P-61 series and I think it would have been a real winner.

Back to the POST WW II Jets page
Updated 8/1/08